Learn how to set up woocommerce to sell digital products.
As a mom blogger, after starting my blog, I started looking for ways to make money from my blog. Blogging is fun for me, but I believe that I should earn money from my blog.
So as a mom blogger, after creating your blog, making money from your blog should be top on your list.
I recently shared how I made my first $200 from my blog.
And now I have added three more ways that I make money from blog. I earn money through Google Adsense and I outlined the steps I followed to apply for Google Adsense and got approved in this blog post. I have also joined a few affiliate programs and you can start earning money from affiliate marketing by reading this affiliate marketing guide for beginners.
So there are many ways to make money from your blog and selling digital products is a great way to earn passive income from your blog.
I love to create digital products, and one of the digital products that I create every week are canva templates for my pinterest account.
I sell canva templates on my blog using woocommerce for wordpress.
Today I want to show you how to set up woocommerce to sell digital products on your wordpress blog.
Contents
How To Set Up Woocommerce To Sell Digital Products On Your WordPress Site
Step 1 – Create A Digital Product
So before you can sell digital products on your mom blog, you need to create the digital products. There are many digital product ideas that you can create and make money. But before you start creating digital products, look at your audience and create a product that they want.
For example, if your blog is about budgeting, you can create budget planners, monthly income, and expenditure trackers. It won’t be right for you to create a fitness planner because obviously the kind of audience visiting your blog is not into fitness, so you might not sell.
Creating a digital products that will serve your audience is one the ways to make money from your blog.
12 Digital Product Ideas
Here are 12 Digital Product Ideas that you can create today and start selling on your wordpress blog to make money
- Ebooks
- Templates
- Media Kits
- Audio Recordings
- Art Work
- Printables
- Patterns
- Logos
- Pinterest Pin Templates
- Instagram Templates
- Powerpoint Templates
- Landing Pages
The list of Digital products that you can sell are actually more than this, just think of the digital product that will serve your audience, create it and sell on your blog and make money.
So if you will like to create digital products and sell on your blog, I will show you the technical side of doing it. That is how to set up woocommerce (The ecommerce platform built for wordpress users).
Let’s get started.

Step 2 – What is Woocommerce And How To Use It
Woocommerce is an ecommerce plugin. It is free and works with any wordpress website.
It is a complete e commerce solution for all WordPress users. You can sell either physical or digital products with it. It works like any other ecommerce platform but mainly on WordPress sites.
So in this blog post, I will show you how to set up Woocommerce, how to add and sell your digital products and also how to add more functionalities to your woocommerce shop.
Step 3 – Set Up Your Website/Blog
Before you can use Woocommerce to start selling your digital products, you need to set up a self hosted wordpress blog.
Also your site must be secured. That is you must have SSL certificate(Security Socket layer responsible for a secure, encrypted connection between a web server and browser) installed on your site. It will be difficult or almost impossible for you to use some payment gateways if you don’t have SSL certificate installed on your site. If you have an SSL certificate installed on your blog, then you will see a small padlock right beside on your domain name on your browser.
If you don’t have a small padlock beside your domain name on the browser, it means SSL certificate is not installed on your site.
You can easily get an SSL certificate from namecheap, and their customer service rep will also install it seamlessly on your site for you.
A good hosting provider like Bluehost offers a free domain name for your first year and a free SSL certificate as well. So if you have not created your site yet, you can get all of that when you sign up for a bluehost account. I will get to that shortly.
But if you have a website already and there’s no SSL certificate installed on your site, then you need to get it first. So follow this link and get SSL certificate for your site.
To set up your site, you need a domain name and a hosting account. I have a tutorial where I’ve outlined the set up process. Follow the steps on bluehost, if you need help: How To Set Up A WordPress Blog
After you have set up WordPress, install a theme. Ensure that the theme you install is compatible with woocommerce.
I currently use the Bluchic Chicboss WordPress theme and I love it. Bluchic creates WordPress themes for female entrepreneurs and they are great for mom bloggers too.
And if you’re looking for an affordable and stylish WordPress theme, then 17thavenuedesigns should be your go-to for Beautiful, functional WordPress themes as a creative entrepreneur and a blogger.
These themes that I recommend are all Woocommerce compatible
Step 4 – Install Woocommerce
Once you have your wordpress site set up, install the Woocommerce plugin.
To install the woocommerce plugin, go your wordpress dashboard, click on “Plugins” > Add New, in the search box, type “Woocommerce”, install and activate the woocommerce plugin.
After installing the woocommerce plugin, it will automatically create the following pages for you:
- Shop
- Cart
- Checkout
- My Account
Please don’t delete them.
Step 5 – Set Up Woocommerce And Start Selling
After installing and activating woocommerce, go through the set up process.
Set Up Woocommerce
- After you hit “Activate”, you will directed to a page that looks like the one below, fill in your details. Make sure that you pay attention to the country and currency.
Because we are talking all about digital products, choose only digital products, and once you’re done hit “Let’s go”
2. In the next window, you will be required to set up payment gateways. I personally use both Paypal and Flutterwave.
To use the paypal gateway, you will need to have a paypal account. To also use the flutterwave, you will also have a flutterwave account. They are both free to sign up.
Sign Up For a Flutterwave Account
I love flutterwave, because they have a seamless payment gateway and accepts money from all over the world. So if a buyer does not want to login to their paypal account, when making any purchase, they can easily pay with flutterwave and I receive my money.
I will show you how to use the both payment gateweays shortly. For now make sure you turn on both payment gatways.
3. When you click “continue” the next window is automated tax calculation. And it is not needed for digital products, so leave it unchecked.
You can connect Facebook or Mailchimp, but I personally don’t use any of them in my Woocommerce shop.
Next window, you will be shown the Jetpack plugin, don’t bother activating it.
Now you have successfully installed and activated Woocommerce on your wordpress blog.
But we still need to do a few things before you can start selling digital products on your woocommerce shop.
So let’s set up the payment gateways.
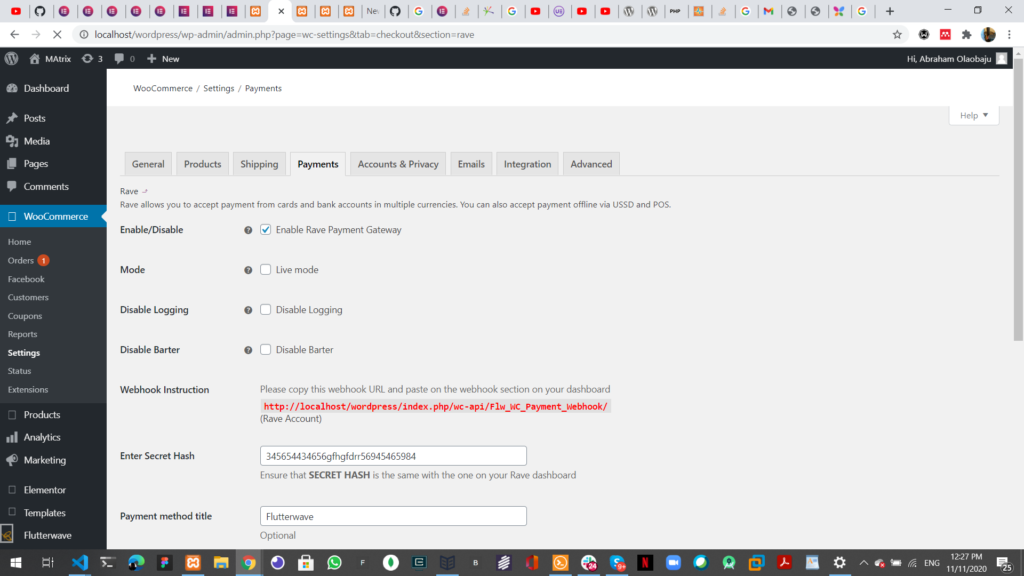
Step 6 – Set Up Flutterwave
This is a Rave payment gateway for WooCommerce.
You can signup for a Rave merchant account here
WooCommerce Rave payment gateway plugin allows you to accept payment on your WooCommerce store through multiple payment channels via Rave by Flutterwave
With this WooCommerce Rave Payment Gateway plugin, you will be able to accept the following payment methods in your shop:
- Card Payments
- Bank Account Payments
- Mobile Wallet Payments
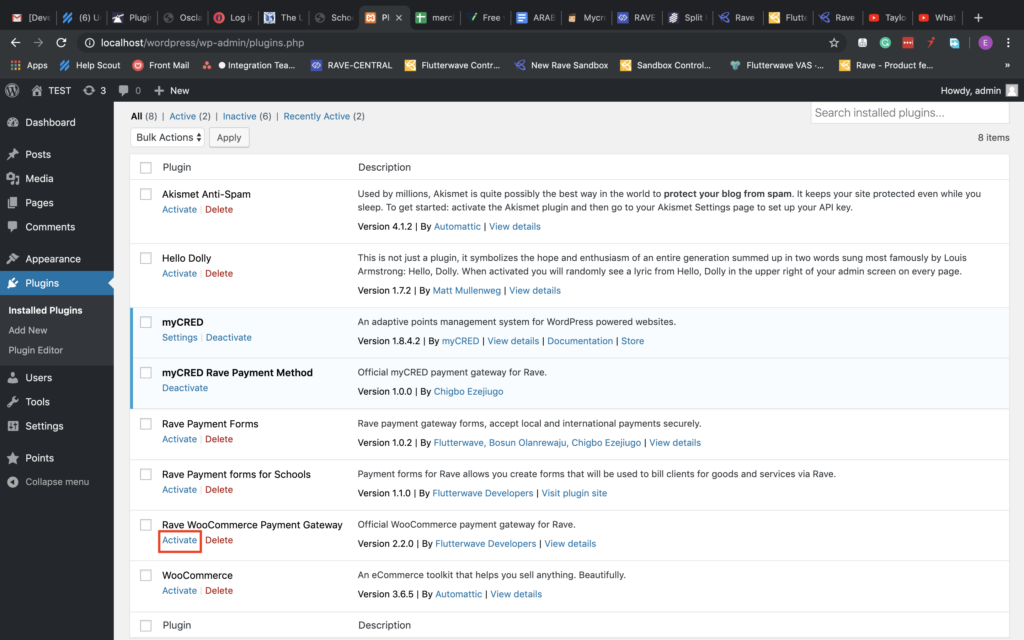
- Navigate to the WordPress admin dashboard of your store and click on “Plugins” on the left-hand side menu.
- Make sure you have the Woocommerce plugin installed and activated already.
- Click on the “Add new” button.
- Search for Rave Woocommerce Payment Gateway and click the “Install Now” button on the Rave Woocommerce Payment Gateway plugin by Flutterwave Developers.
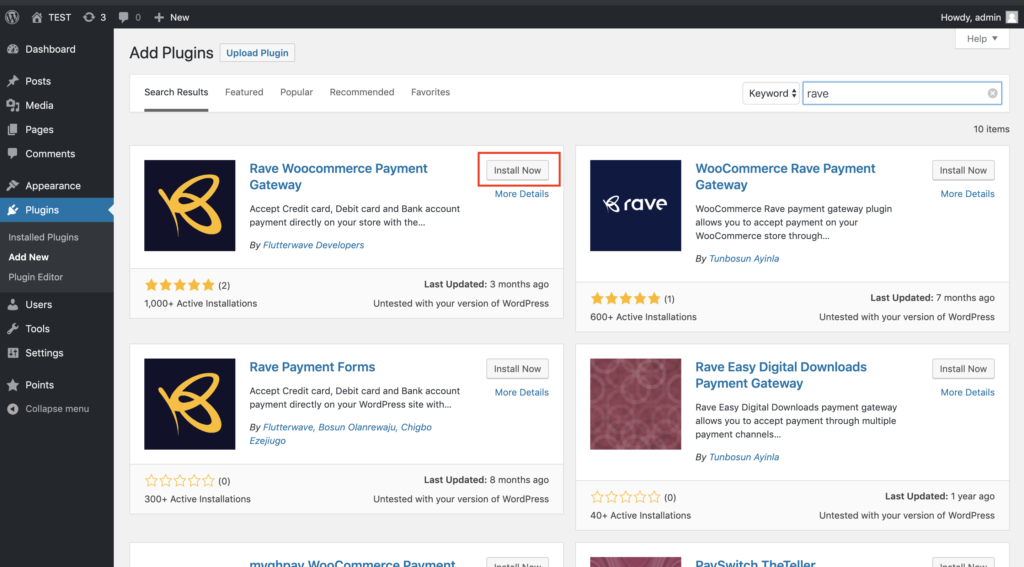
- On the list of installed plugins find “Rave WooCommerce Payment Gateway” and click on Activate.
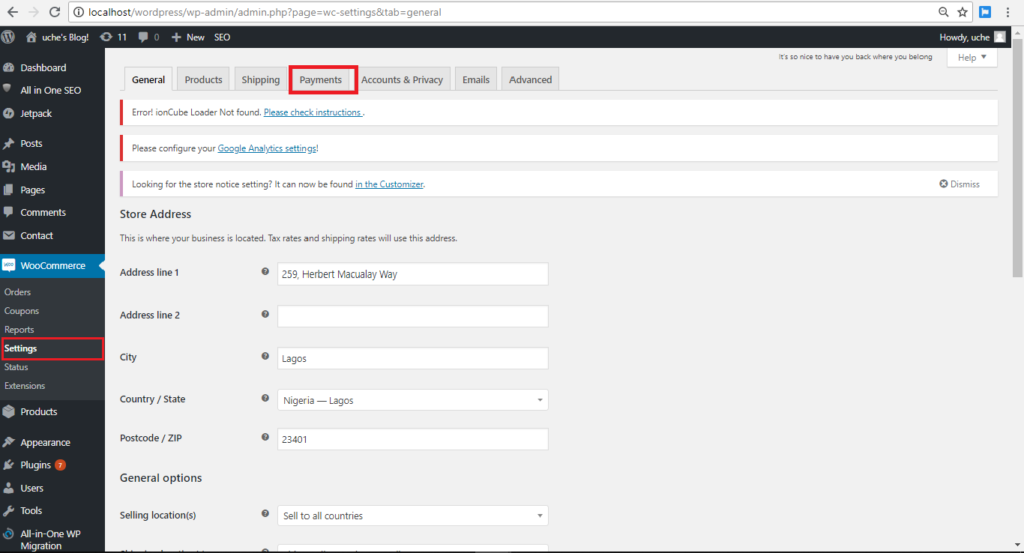
- Click on “WooCommerce” > “Settings” from the left menu and click on the “Payment” tab.
- Under the checkout options, Enable Rave and click the “Set Up” button.
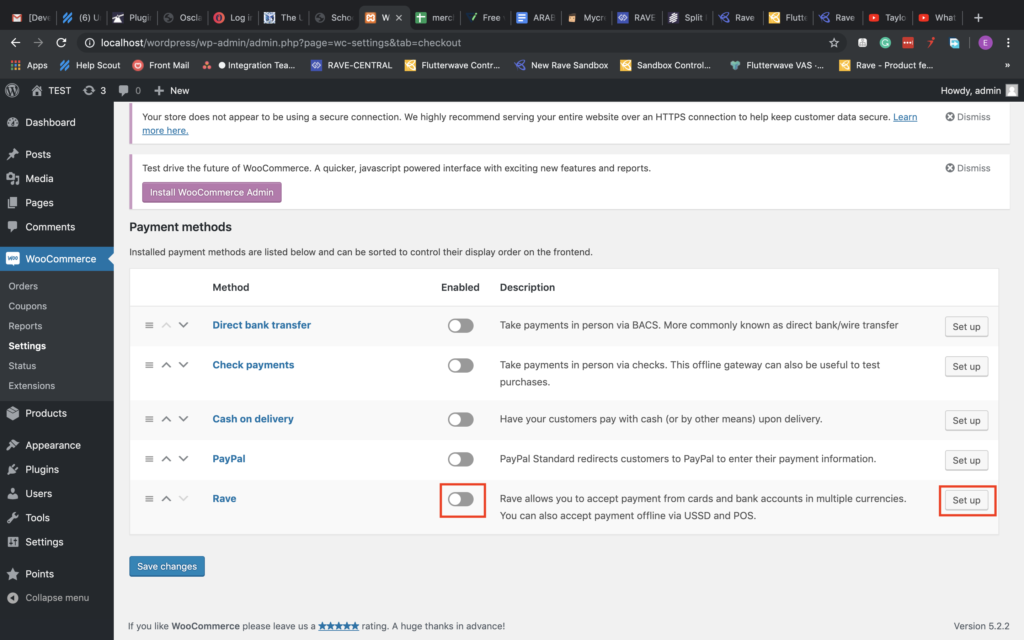
- Configure your Rave Payment Gateway settings accordingly.
- Check the Enable/Disable checkbox to enable Rave Payment Gateway
- You make also choose to Enable/Disable Logging
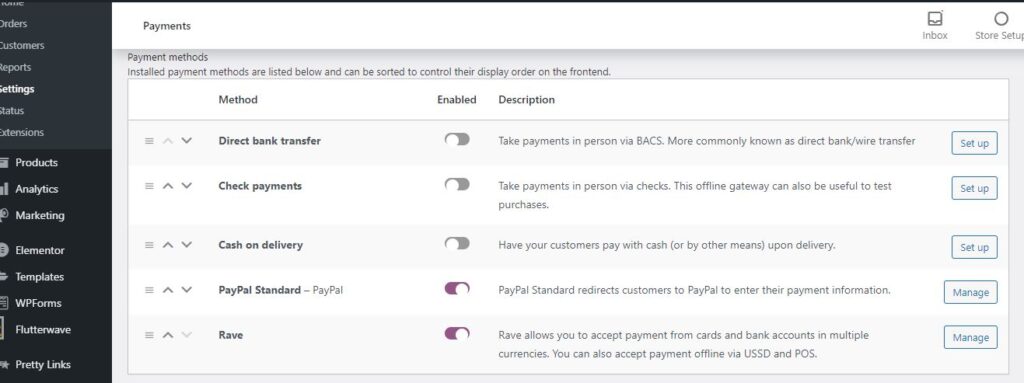
Step 7 – Set Up Paypal In Woocommerce
To set up paypal in woocommerce, go to Woocommerce > Settings > Payments.
Enable the paypal option and click on the set up next to it.
Go through the set up process: Add your paypal email address
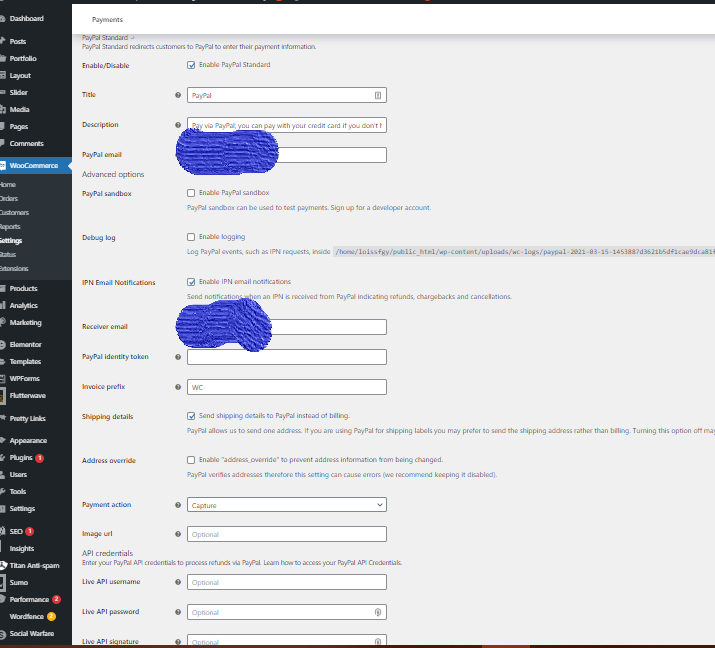
Go through the set up process:
- Ensure you check to enable Paypal Standard
- Enter your Paypal email address. This is how Paypal will send your money to you.
- Enter your receiver email as well.
- Check IPN email notifications. It is used for refunds. Although we are talking about digital products here, and typically there are no refunds. But I will advise that you still keep it checked.
- Make sure payment action is set to “Capture”
- Live the API credentials blank
- Save changes.
Check Your Shop Related Pages
When you install and activate the Woocommerce plugin, it will create four(4) pages for you: Shop, Cart, Checkout, and My Account.
The Shop Page is where your products are shown
The Cart Page hold the items the buyer intends to buy after the buyer clicks “Add to cart”.
The Checkout Page is where the payment is processed
The Account Page is where your buyers can see their purchase history.
If you have a theme that is Woocommerce compatible, everything will reflect they style of the theme and will work efficiently.
Settings For The Account and Privacy Tab
Next you should make sure the check the right things under the “Account and Privacy” Tab.
You can take a look at the image below and check the right boxes accordingly.
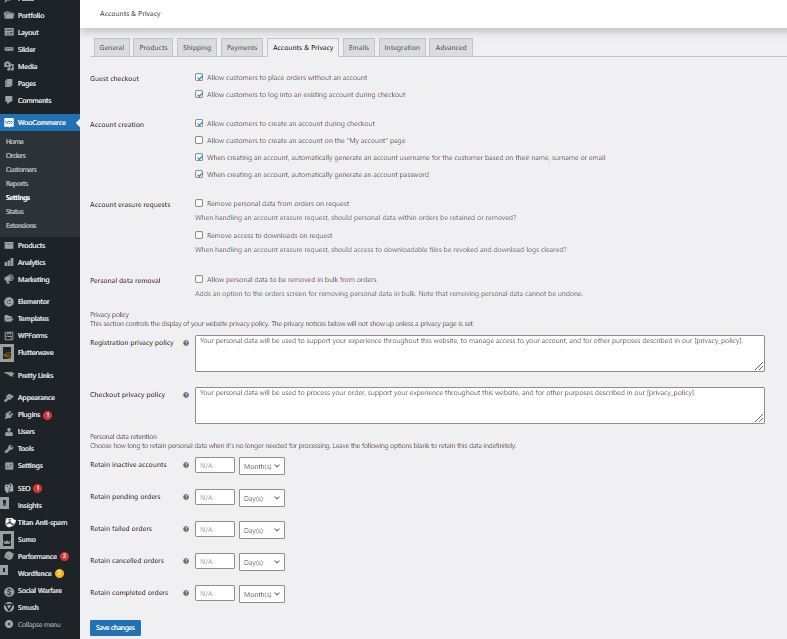
Below are the settings that I am using:
- Check the option to allow customers place orders without an account.
- Check the option that says “allow customers to login to an already existing account”.
- Check allow customers to create an account during checkout.
- Check when creating an account, automatically generate a username from the customer’s email address
- Check when creating an account, automatically generate an account password.
Then save your changes.
How To Add Digital Downloadable Products In Woocommerce
Adding a product is very simple. It’s just like creating a new post or a page, but on Woocommerce you will need to add more functionalities like price, description, product images and set the product to be downloadable.
So here’s a quick run down of the step to follow:
- Go to your WordPress Dashboard click on Products > Add New
- Add the Title and Descriptions. Woocommerce has two places where you can add the description for your product. The first description will show right beneath the product image on the product page. And the second description box is the one that shows at the top next to the product image, at the actual product page on the site.
- Add Product Images. Woocommerce also has two places where you can product images. The first one is the “product image” which is the main product image that shows up at the shop, and also the larger image that people see on the shop. The second one is the “product gallery”, here you can add 5 to 10 images of the product.
- Set the price and make the product downloadable. Now if you scroll down you will see a section where you can set the price for your product and add the actual downloadable product. Look closely at the image below.
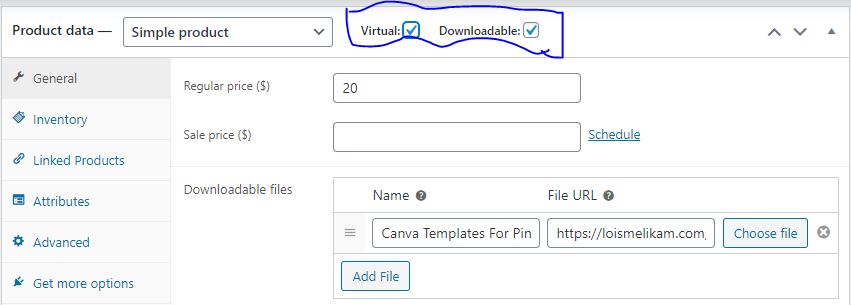
Make sure to choose “Simple Product” and check both “virtual” and “downloadable”.
Under the “General” tab, set the price and add the actual file that your buyers will be able to download upon purchase.
You can also set download limit and expiry. But if you don’t mind, you can leave it blank.

Under the “Inventory” tab, you can set up how many products you’re selling. Since they are digital products, I don’t think it’s necessary to set a limit, but the choice is yours to make nonetheless.
Also, because these are downloadable products, there’s no need to allow backorders.
Make sure you also check “sold individually” because no one needs multiple copies of a digital product and so that you can avoid having to deal with refunds which will take up your time.
Once you have added your product and set all functionality in place, you can click the publish button and your product will be available for purchase to others.
How To Set Up Woocommerce To Sell Digital Products
So in summary, all you have to do is to create your own digital products and start selling on your wordpress site.
It’s an easy an fun way to make money from your blog without much hassle
If you have any question, do let me know in the comment section below.
And please share this post with your friends, family and love ones.


Thanks for giving me ideas. I did not know that WooCommerce can also store digital products.
Glad to be of help. Woocommerce makes it easy to sell digital products on your WordPress site.
Will posting digital products on woocomerce will have problems with storage space? My website was so slow and cant edit anymore and the hosting said i have to upgrade the plan in order to continue.
It depends on your host and your storage space too. Perhaps you can upgrade your hosting package.