Learn how to claim your website on pinterest, so that you can get access to pinterest cool features like:
- Pinterest Analytics
- Pinterest ads program
- Stats for your pins and many more.
I will show you exactly how to verify your wordpress site on pinterest.
Verifying your pinterest account will enable you to learn more about your visitors using Pinterest Analytics.
You will also be able to use the pinterest ads program, and also plan on how to grow your pinterest traffic.
Contents
How To Claim Your Website On Pinterest
To claim your website, you will need first upgrade your pinterest account to business. This will unlock all the pro tools for you such as analytics, ads program and many more.
The pinterest business account is also free and easy to set up
Get A Business Account
Sign up for a free pinterest business account to get access to Pinterest Analytics to see how your pins perform and other tools to help grow your presence professionally on pinterest.
How To Create A Pinterest Business Account
If you do not have an account yet on Pinterest, follow the steps below and create a new pinterest business account.
- Create your business account(opens in a new window)
- Enter your Email, Password and Age
- Click Create account
- Follow the prompts to complete your business profile:
- Click the edit icon to add your profile picture
- Enter your business name
- Add your website, if you have one
- Select your Country/region
- Select your Language
- Click Next
- Select one of the options from the drop-down menu for the focus of your business, then click Next
- Select what type of business you are, then click Next
- Choose whether you want to run ads or select I’m not sure yet
- Click Next
- Choose to Create a Pin, Grow your audience, Showcase your brand, or click the cancel icon to go to your new Pinterest business profile
If you’re creating a business account to access an ad account, we recommend using your work email address and your real name instead of your business name. This helps account owners identify and validate the people who have access to their account. Select Other for Business type.
If you already have personal pinterest account, you can can do any of the following:
- Create a linked business account. You’ll can login to the same account with the same email and password. You can link up to 4 accounts.
- Convert your personal account into a business account
Link A Personal Account To Your Business Account
- Log into your personal Pinterest account
- Click the directional chevron down icon in the top-right corner to open your menu
- Select Settings
- Click Account settings from the left-side navigation
- Under Account changes, click Get started next to Linked business account
- Click Create a linked business account
- Follow the prompts to create your business account:
- Click the edit icon to add your profile picture
- Enter your business name
- Add your website, if you have one
- Select your Country/region
- Select your Language
- Click Next
- Select one of the options from the drop-down menu for the focus of your business, then click Next
- Select what type of business you are, then click Next
- Select Yes or No if you do or do not want to run ads or select I’m not sure yet
- Click Next
- Choose to Create a Pin, Grow your audience, Showcase your brand, or click the cancel icon to go to your Pinterest business profile
Convert Your Personal Account To A Business Account
If you have a personal account, you can convert it to a business account so that you can get access to all the pro tools.
- Log into your personal Pinterest account
- Click the directional chevron down icon in the top-right corner to open your menu
- Select Settings
- Click Account settings from the left-side navigation
- Scroll down to Account changes and click Convert account
- Click Continue
Claim Your Website On Pinterest
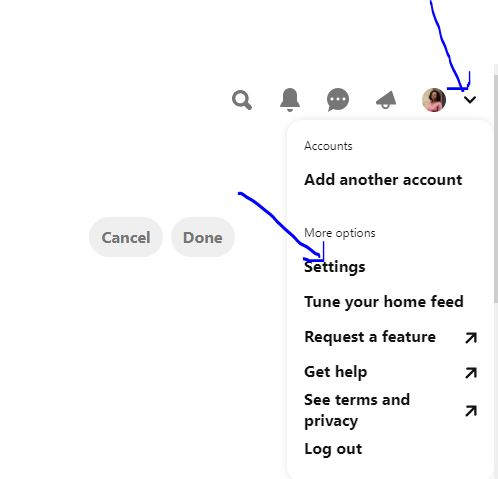
To claim your website, sign into your pinterest account, navigate to the top right corner and click on the drop down arrow right beside your profile picture, select setting.
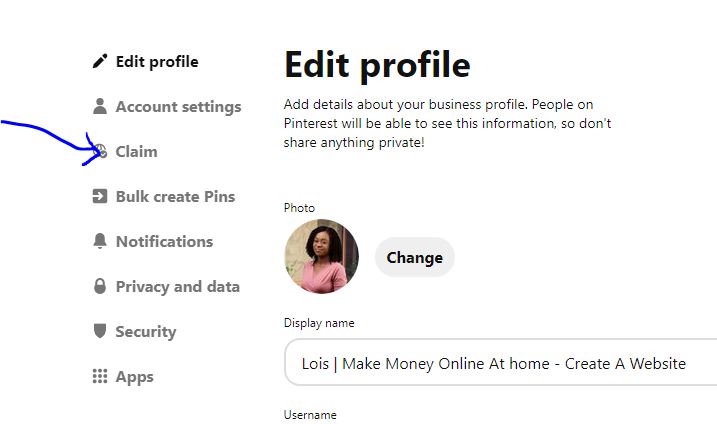
After click on settings, click on “claim” the left side.
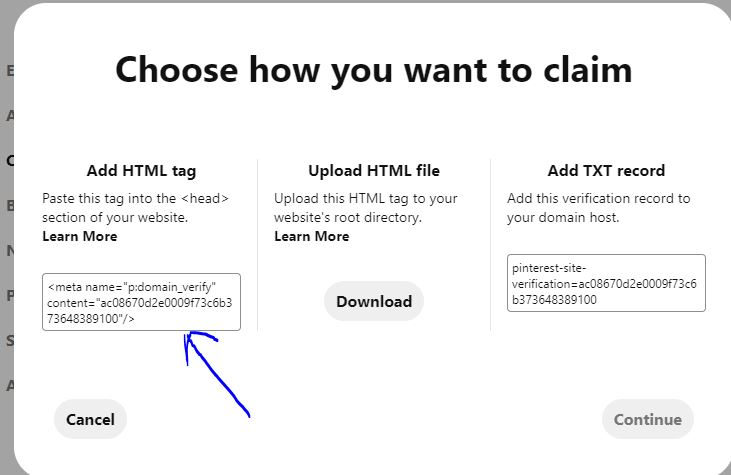
Then scroll down and click on claim as seen in the image below.

When you click on claim another window will pop up with tags as seen in the image below.
How To Claim Your Website On Pinterest With Yoast SEO Plugin.
The easiest way to claim your wordpress site on pinterest is to use the Yoast SEO plugin.
Add HTML Tag In Your WordPress site
So right now, login to your wordpress dashboard and navigate to the left panel, and click on SEO, then Social.
Under the facebook tab, enable the open graphs settings.

Next go to the Pinterest tab, in the pinterest confirmation field, paste the HTML tag you copied from pinterest. Once you’re done, click the save button to save the changes.

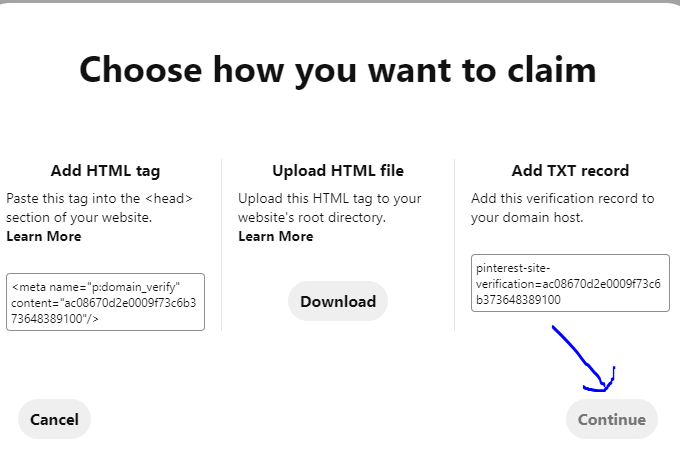
Once you’re done, go back to pinterest and click on the “continue” button.
Once you click on the “continue” button, you will see another page where you will enter your website url. When entering your website url, just enter your url without any prefix.
For example, to claim my website, I simply entered loismelikam.com. Don’t add either www or https else you might get an error message.
Once you’re done, pinterest will send you an email about the verification of your website.

Once you’re done, you will see the confirmation like the image above.
After verification, you can use pinterest tools like analytics, ads program and many more.
I hope this blog post have helped you claim your wordpress site on pinterest.
If you like it, please share this blog post with your friends.
You can also follow me on Pinterest
Hello! Someone in my Myspace group shared this site with us so I came to look it over.
I’m definitely enjoying the information. I’m book-marking and will be tweeting this to my followers!
Excellent blog and excellent design. I’ll right away seize your rss feed as
I can not find your email subscription link or newsletter
service. Do you’ve any? Please permit me recognize so that I may subscribe.
Thanks. Greetings from Idaho! I’m bored to death at work so I
decided to check out your site on my iphone during
lunch break. I enjoy the information you provide here and can’t wait to
take a look when I get home. I’m amazed at how quick your
blog loaded on my phone .. I’m not even using WIFI, just 3G ..
Anyways, very good blog!
Hi Barshan, thanks for stopping by. It’s good to have you here. I appreciate your kind words and do share my blog to your followers.
You can join my email list with through this link. http://loismelikam.com/create-your-website-free-email-course/